Anterior cruciate ligament (ACL) injuries are common, and arthroscopic ACL reconstruction is a routine procedure. Successful ACL reconstruction requires correct placement of the graft within the anatomical insertion of the native ACL.1-3 Errors in surgical technique—specifically, improper femoral tunnel placement—are the most common cause of graft failure in patients who present with recurrent instability after ACL reconstruction.4 There has been much emphasis on placing the tunnel more centrally in the ACL footprint as well as in a more horizontal position, which is thought to provide better rotational control and anterior-to-posterior translational stability.5-7
Two common techniques for creating the femoral tunnel, transtibial and anteromedial drilling, have their unique limitations. Transtibial drilling can place the tunnel high in the notch, resulting in nonanatomical, vertical graft placement.8,9 This technique can be modified to obtain a more anatomical tunnel, but the risk is the tunnel will be short and close to the joint line.10 To avoid these difficulties, surgeons began using an anteromedial portal.11,12 Although anteromedial drilling places the tunnel in a more anatomical position, it too has drawbacks, including the need to hyperflex the knee, a short tunnel, damage to articular cartilage, proximity to neurovascular structures, and difficulty in visualization during drilling.13-16
Femoral tunnel drilling techniques using flexible guide pins and reamers have been developed to address the limitations of rigid instruments. When we first started using flexible instruments through anteromedial portals, there were multiple incidents of reamer breakage during drilling. We therefore developed a technique that uses a flexible guide pin with a rigid reamer to place the femoral tunnel in an anatomical position. The patient described in this article provided written informed consent for print and electronic publication of this report.
Technique
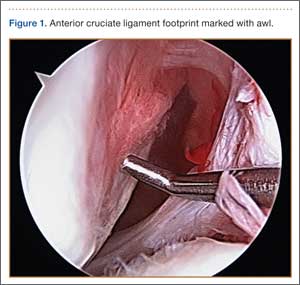
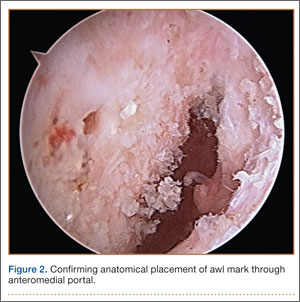
We begin with our standard arthroscopic portals, including superolateral outflow, lateral parapatellar, and medial parapatellar portals. The medial parapatellar portal is placed under direct visualization with insertion of an 18-gauge spinal needle, ensuring the trajectory reaches the anatomical location of the native ACL on the lateral femoral condyle (LFC). The ACL stump is débrided with a shaver and a radiofrequency ablator, leaving a remnant of tissue to assist with tunnel placement. We do not routinely perform a notchplasty unless there is a concern about possible graft impingement, or the notch is abnormally small. The anatomical footprint is marked with a small awl (Figure 1), and the arthroscope is moved into the anteromedial portal to confirm anatomical placement of the awl mark (Figure 2).
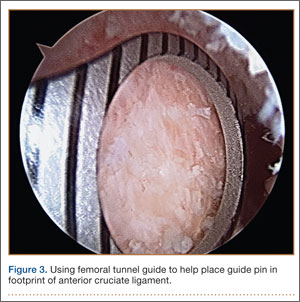
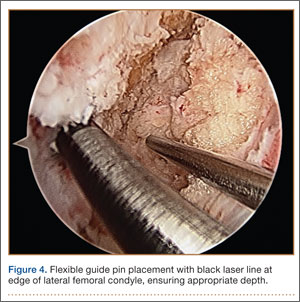
With the knee flexed to 100° to 110°, a flexible 2.7-mm nitonol guide pin (Smith & Nephew, Memphis, Tennessee) is placed freehand through the anteromedial portal into the anatomical footprint of the ACL, marked by the awl, and is passed through the femur before exiting the lateral skin. In most cases, we prefer freehand placement of the awl and pin; however, a femoral drill guide may be used to place the pin into the anatomical footprint of the ACL (Figure 3). The flexible pin allows for knee hyperflexion, clearance of the medial femoral condyle, central placement of the pin between the footprints of the anteromedial and posterolateral bundles for anatomical single-bundle reconstruction, and drilling of a long tunnel (average, 35-40 mm). The pin has a black laser marking that should be placed at the edge of the articular surface of the LFC to ensure appropriate depth of insertion (Figure 4).
A small incision is then made around the guide wire on the lateral thigh, and an outside-in depth gauge is used to obtain an accurate length for the femoral tunnel. The gauge must abut the femoral cortex for accurate assessment of tunnel length. We use an Endobutton (Smith & Nephew) for fixation of the graft in the tunnel. The measured length of the tunnel is used to select an Endobutton of appropriate size and the proper reaming depth for suspension. We routinely use a 10- or 15-mm Endobutton, which provides an average 20 to 25 mm of graft inside the bony tunnel. The knee may then be relaxed to a normal resting flexion angle off the side of the bed, and the arthroscope is inserted into a medial portal or an accessory anteromedial portal to ensure anatomical placement of the pin. Using a flexible guide pin allows the knee to be relatively extended, providing good visualization of overall positioning in relation to the posterior wall of the LFC, whereas keeping the knee in a flexed position (as with a rigid guide pin) can often compromise this visualization.
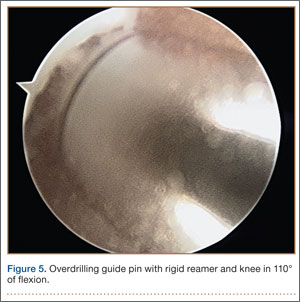
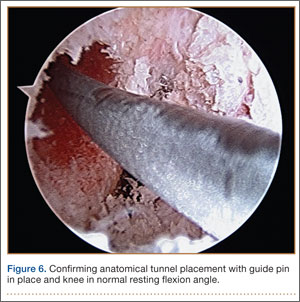
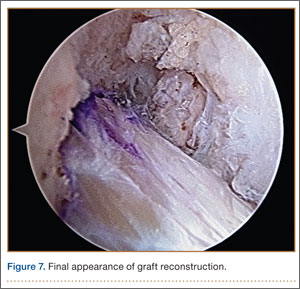
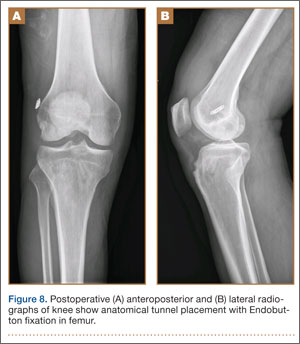
Using a solid reamer corresponding to the size of the graft, we drill over the guide pin to the appropriate depth, again with the knee hyperflexed (Figure 5), making sure not to breach the lateral femoral cortex, which would compromise fixation with the Endobutton. After drilling with the rigid reamer is completed, placement of the tunnel in an anatomical position is again confirmed with the knee in the normal resting flexion angle (Figure 6). Once the tibial tunnel is drilled at the anatomical footprint, the graft is passed with the proper-length Endobutton and is fixed on the tibial side with a bioabsorbable interference screw 1 to 2 mm larger than the soft-tissue graft and tibial tunnel size. The knee is flexed to 30° while the tibial screw is placed. Graft tension and impingement are then checked (Figure 7). Postoperative anteroposterior and lateral radiographs of the knee may be obtained to confirm anatomical placement of the tunnels as well as proper positioning of the Endobutton (Figures 8A, 8B).