Dr. Advincula is the Levine Family Professor of Women’s Health and Vice-Chair, Department of Obstetrics & Gynecology, and Chief of Gynecology, Sloane Hospital for Women at Columbia University Medical Center in New York, New York.
Dr. Truong is Assistant Professor and Director, Minimally Invasive Gynecology, Virginia Commonwealth University, Richmond, Virginia.
Dr. Advincula reports being a consultant to Blue Endo, CooperSurgical, Intuitive Surgical, SurgiQuest, Titan Medical and receiving royalties from CooperSurgical. Dr. Truong reports no financial relationships relevant to this article.
Use beef tongue, a cardboard box, and a homemade self-retaining wound retractor to teach or perfect your extracorporeal C-incision tissue extraction (ExCITE) technique before entering the OR
In November 2014, following concerns regarding the use of electromechanical, or power, morcellation, we published a surgical technique called the extracorporeal C-incision tissue extraction, or ExCITE, technique, as an alternative to contained tissue extraction during minimally invasive gynecologic procedures such as myomectomy and hysterectomy.1 This technique was developed to create a simple, reproducible, and minimally invasive approach to tissue extraction without the need for power morcellation. ExCITE is trainee-friendly and teachable.
In this article, we will review the steps for successful execution of the ExCITE technique. In addition, we will describe how to create your own cost-effective simulation model for teaching, learning, and practicing this technique with a few simple materials found in any craft or grocery store. Simulation is essential. It helps to troubleshoot issues that may arise in an actual case and allows for learning and practicing of surgical techniques to improve the learning curve and efficiency in the operating room (OR).
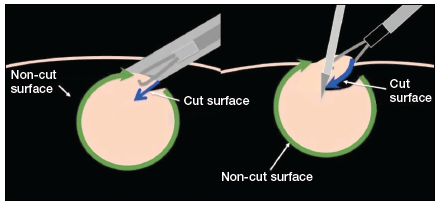
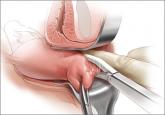
ExCITE operative technique “Traditional” intracorporeal tissue extraction techniques use power morcellation without specimen containment. The specimen is grasped with a tenaculum and pulled through the device. The specimen is essentially peeled like an apple and results in long strips of tissue with both a “cut” and “noncut” or intact surface due to the way the blade incises the tissue (FIGURE 1). When performing extracorporeal tissue extraction, we are replicating essentially the same mechanism of tissue removal. With ExCITE, however, the specimen is contained, there is no power morcellator, and tissue extraction is performed manually (FIGURE 2).
FIGURE 1 Without the use of a power morcellator, uterine tissue can be removed minimally invasively by manually incising tissue using a C-incision. This approach results in a long strip of tissue—similar to coring an apple.
FIGURE 2 Intracorporeal power morcellation vs extracorporeal manual tissue extraction
The ExCITE technique can be broken down into 5 major steps:
1. specimen retrieval and containment 2. self-retaining retractor placement 3. creation of the C-incision 4. tissue extraction 5. fascial closure.
1. Specimen retrieval and containment First, place the specimen in an endoscopic specimen retrieval bag. Extend the incision at the umbilicus, to approximately 2.5 to 3.5 cm (roughly 2 good fingerbreadths), and exteriorize the bag at the level of the umbilicus.
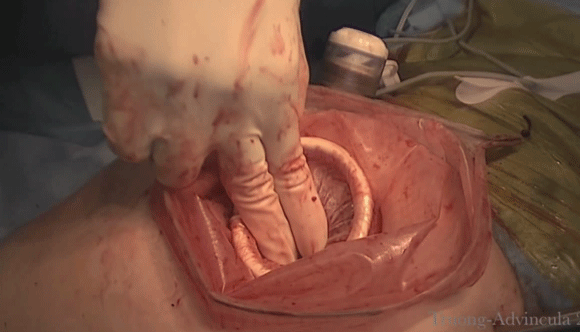
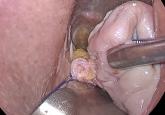
2. Self-retaining retractor placement Next,place a small disposable self-retaining retractor, (we prefer the extra-small Alexis-O) inside the bag, which helps keep the bag in position at the umbilicus (FIGURE 3).
FIGURE 3 Self-retaining retractor at the umbilicus Make the umbilical incision at least 2 fingerbreaths, or approximately 2.5- to 3.5-cm wide.
Tip. When inserting the retractor, push it in all the way until the entire bottom ring is inside of the bag. This allows for the retractor ring to deploy. Allow some space between the specimen and the opening of the bag when placing the retractor. Do not pull the bag too tightly against the anterior abdominal wall as this may prevent the retractor ring from deploying fully and make the specimen extraction step more difficult.
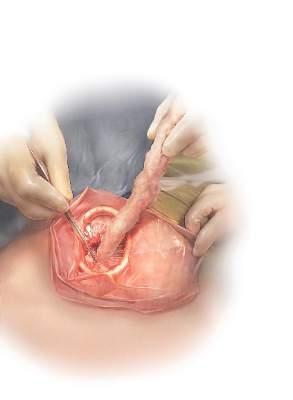
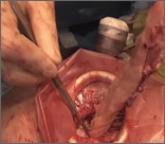
3. Creation of C-incision Grasp the specimen with a penetrating clamp (such as a tenaculum, Lahey, or towel clamp) and pull the specimen flush against the incision and retractor. Use a #11 or #10 blade scalpel to create a reverse “C-incision,” with the clamp in your nondominant hand and the scalpel starting the C-incision from your nondominant side moving toward your dominant side. (The curve of the “C” faces your dominant side.)
Tip.It is important to make your C-incision wide enough to get an adequate sized specimen strip through the umbilicus but not too wide (ie, too flush with the retractor), as this will decrease your workspace and increase the risk of cutting the retractor or the bag. It is helpful to hold the scalpel like a pencil and use a sawing-like motion rather than trying to advance the scalpel through the tissue in one motion.
4. Tissue extraction Re-grasp the tissue flap, or “nub,” created by the C-incision with the penetrating clamp. While maintaining tension on the specimen, continue cutting with a sawing-like motion, using a reverse C coring technique, keeping one surface completely intact. (Generally this is the surface facing your nondominant side.) When cutting, the tissue becomes a strip, similar in appearance to when using a power morcellator. In fact, the technique is very similar to peeling an apple all the way around while trying to keep the skin of the fruit intact.
Tip. Try to angle the scalpel slightly when cutting the tissue, especially at the curve of the C. In other words, keep the tip of the scalpel toward the center of the strip and the handle away from the center, angled closer to the abdominal wall. When achieving an adequate strip of tissue, often the specimen will start rolling (similar to power morcellation). If this occurs, “go with the roll” by modifying the C-coring incision to a half C and incising along the top part of the C repeatedly until the specimen stops rolling. At that point, complete the C. Be sure to re-grasp near the specimen base as you continue the procedure and as the strip gets longer to prevent premature breakage of the strip and for ease of maintaining tension.
5. Fascial closure After the specimen is completely extracted, remove the self-retaining retractor and specimen bag. Close the fascia at the umbilical incision. We prefer to close the fascia with an 0-polysorb (absorbable) suture in a running fashion, but you may consider an interrupted closure or use delayed absorbable sutures such as polyglyconate/polydioxanone (maxon/PDS).
Tip. To facilitate removal of the self-retaining retractor, pull on the specimen retrieval bag at one apex in order to collapse the retractor ring inside the bag. This allows removal of the bag and retractor simultaneously.